> ## Documentation Index
> Fetch the complete documentation index at: https://docs.stru.ai/llms.txt
> Use this file to discover all available pages before exploring further.
# Connection Design
> Brief one connection at a time with member sizes, factored loads, material and bolt grades, and the code, and get a connection calc you can check line by line
## One Connection Per Request
Shear tabs, base plates, splices, welds: give the agent the member sizes, the factored loads, the material and bolt grades, and the code, and it returns a connection calc sheet laid out to be checked line by line. Design one connection per request: the shear tab lands, then the base plate, then the splice, each building on the last.
The same brief works wherever the connection lives: a beam-to-column shear tab in an office building, a base plate under a transit canopy column, a welded splice on a pipe rack.
```text A complete connection brief theme={null}
Design a bolted shear tab connection: W18x35 beam to W12x65
column flange, 42 kip factored end reaction. A992 members,
A36 plate, 3/4 in A325-N bolts, E70XX fillet welds.
AISC 360-22 LRFD. Cite the spec section for every limit state
you check.
```
"Check this connection" gets a generic answer. The brief above gets a calc you can sign off on.
***
## Step-by-Step
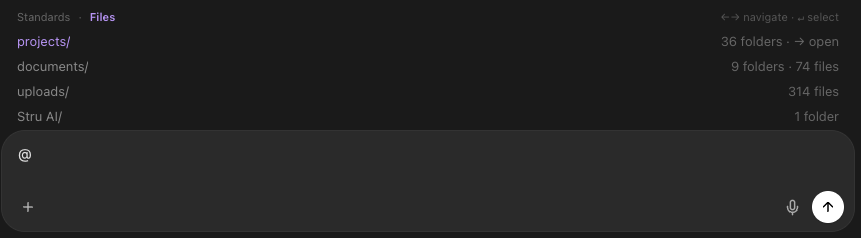
Type **@** in the message box and tag the framing plan or connection detail from your [Files area](/how-to/file-management), so the agent works from your geometry and your numbers instead of a description. The [Mentions guide](/how-to/mentions) covers the picker.
 Cover the four things every connection calc needs:
* **Geometry**: the members being joined, and the plate or weld arrangement if you have one in mind
* **Loads**: the factored forces the connection must carry
* **Materials**: member and plate grades, bolt grade and diameter, electrode
* **Code**: the standard, the edition, and LRFD or ASD
The calc sheet builds live in the [Canvas](/how-to/canvas) beside the chat: project reference, code references, each limit state checked with its spec section, and the final design status. The finished files arrive as download links; the deliverable side is covered in [Mathcad Calc Sheets](/workflows/mathcad-calc-sheets).
Cover the four things every connection calc needs:
* **Geometry**: the members being joined, and the plate or weld arrangement if you have one in mind
* **Loads**: the factored forces the connection must carry
* **Materials**: member and plate grades, bolt grade and diameter, electrode
* **Code**: the standard, the edition, and LRFD or ASD
The calc sheet builds live in the [Canvas](/how-to/canvas) beside the chat: project reference, code references, each limit state checked with its spec section, and the final design status. The finished files arrive as download links; the deliverable side is covered in [Mathcad Calc Sheets](/workflows/mathcad-calc-sheets).
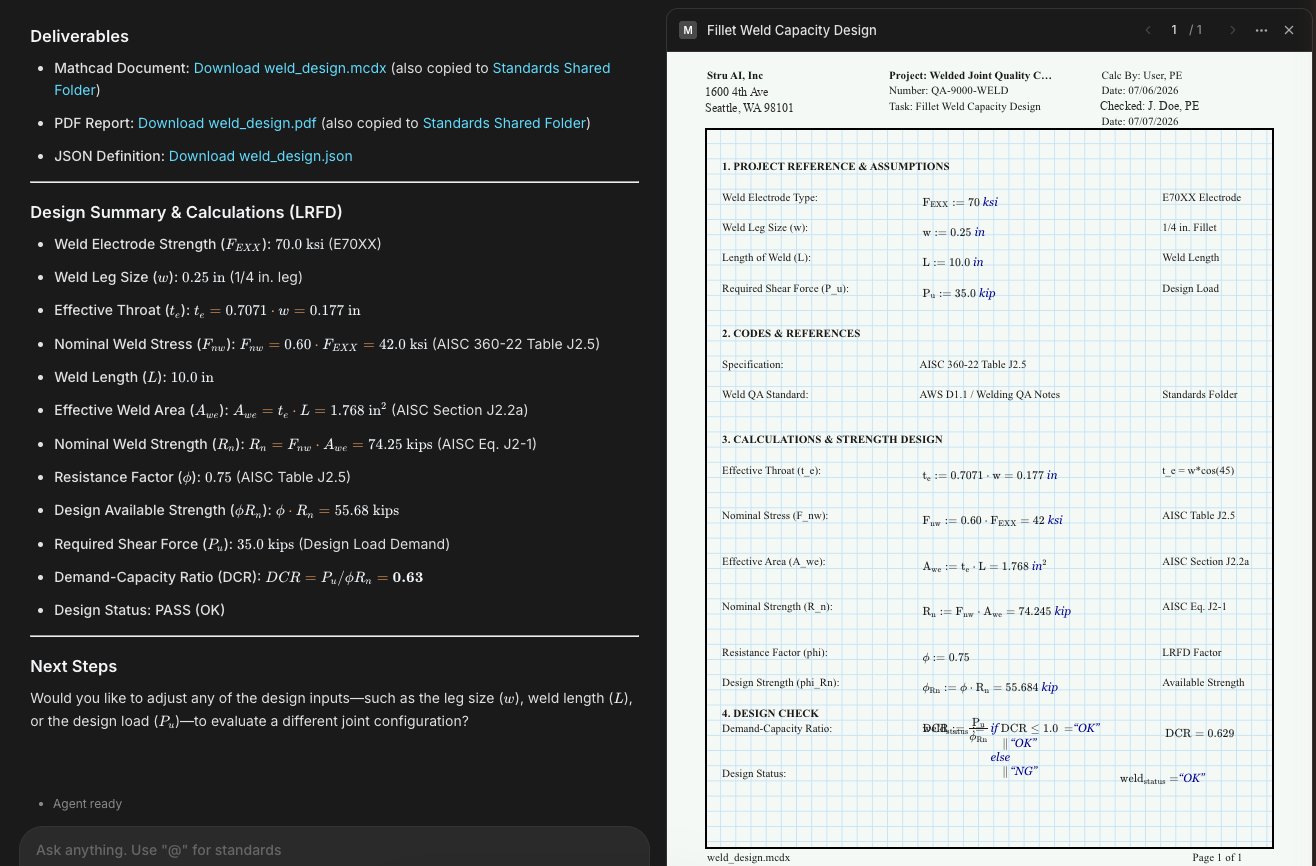 **Set your header fields first.** Project name, number, calc by, checked by, and your company logo carry onto every sheet. See [Branded Reports](/workflows/branded-reports).
One follow-up turns the draft into a plan:
```text The follow-up theme={null}
List every limit state you did not check for this connection,
and why each one could matter here.
```
Prying action, block shear on the coped beam, weld access: whatever comes back is your checklist for the next request.
Keep the thread going and reference what is already on the table: "Now design the base plate for the same column, using the reactions from the shear tab calc." One connection per request keeps every calc clean and checkable.
***
## More Briefs That Work
```text Base plate theme={null}
Design the base plate for an HSS8x8x1/2 canopy column:
120 kip factored axial, 15 kip factored shear. A36 plate on
4000 psi concrete, 3/4 in F1554 Grade 36 anchor rods.
AISC 360-22, LRFD. Cite the sections you use.
```
```text Weld check theme={null}
Check a fillet weld: E70XX electrode, 1/4 in leg, 10 in weld
length, 35 kip required shear. AISC 360-22 LRFD. Quote the
table you take the nominal weld stress from.
```
Both follow the same shape as the shear tab brief: geometry, loads, materials, code, and a request for citations.
You are the engineer of record: the agent checks the limit states and cites the sections, and you verify the calc line by line before it goes in the package.
***
## Next Steps
The sibling workflow for members: beams, columns, footings
[Design Checks](/workflows/design-checks)
The calc deliverable: formats, downloads, checking
[Mathcad Calc Sheets](/workflows/mathcad-calc-sheets)
Header fields and your logo on every sheet
[Branded Reports](/workflows/branded-reports)
The agent behind this workflow, end to end
[Structural Agent guide](/platform-guides/structural-agent)
**Questions?** Email **[support@stru.ai](mailto:support@stru.ai)** or [book a call](https://cal.com/bhosh).
**Set your header fields first.** Project name, number, calc by, checked by, and your company logo carry onto every sheet. See [Branded Reports](/workflows/branded-reports).
One follow-up turns the draft into a plan:
```text The follow-up theme={null}
List every limit state you did not check for this connection,
and why each one could matter here.
```
Prying action, block shear on the coped beam, weld access: whatever comes back is your checklist for the next request.
Keep the thread going and reference what is already on the table: "Now design the base plate for the same column, using the reactions from the shear tab calc." One connection per request keeps every calc clean and checkable.
***
## More Briefs That Work
```text Base plate theme={null}
Design the base plate for an HSS8x8x1/2 canopy column:
120 kip factored axial, 15 kip factored shear. A36 plate on
4000 psi concrete, 3/4 in F1554 Grade 36 anchor rods.
AISC 360-22, LRFD. Cite the sections you use.
```
```text Weld check theme={null}
Check a fillet weld: E70XX electrode, 1/4 in leg, 10 in weld
length, 35 kip required shear. AISC 360-22 LRFD. Quote the
table you take the nominal weld stress from.
```
Both follow the same shape as the shear tab brief: geometry, loads, materials, code, and a request for citations.
You are the engineer of record: the agent checks the limit states and cites the sections, and you verify the calc line by line before it goes in the package.
***
## Next Steps
The sibling workflow for members: beams, columns, footings
[Design Checks](/workflows/design-checks)
The calc deliverable: formats, downloads, checking
[Mathcad Calc Sheets](/workflows/mathcad-calc-sheets)
Header fields and your logo on every sheet
[Branded Reports](/workflows/branded-reports)
The agent behind this workflow, end to end
[Structural Agent guide](/platform-guides/structural-agent)
**Questions?** Email **[support@stru.ai](mailto:support@stru.ai)** or [book a call](https://cal.com/bhosh).