> ## Documentation Index
> Fetch the complete documentation index at: https://docs.stru.ai/llms.txt
> Use this file to discover all available pages before exploring further.
# Build Models in ETABS & SAP2000
> Describe the structure and the agent builds it live in the ETABS or SAP2000 on your machine: grids and stories first, then framing, then loads, then the run
## From Brief to Running Model
Describe the structure and the agent builds it in the ETABS or SAP2000 installed on your machine, live on your screen, with your licenses and your section databases. The connection runs through the Stru AI desktop app: set it up once with [Connecting ETABS & SAP2000](/desktop-app/connect-etabs-sap2000), then model by conversation.
Jobs this page covers:
* **Build a model from a brief**: geometry, sections, loads, and combinations from one written description
* **Build from structural drawings**: attach the framing plans and schedules and model from them
* **Build from an IFC model**: turn a BIM model into an analysis model
* **Build a bridge in SAP2000**: the same staged pattern, applied to spans instead of stories
Here the agent builds a braced steel frame from a one-paragraph brief, ticking off its task list as the model grows:
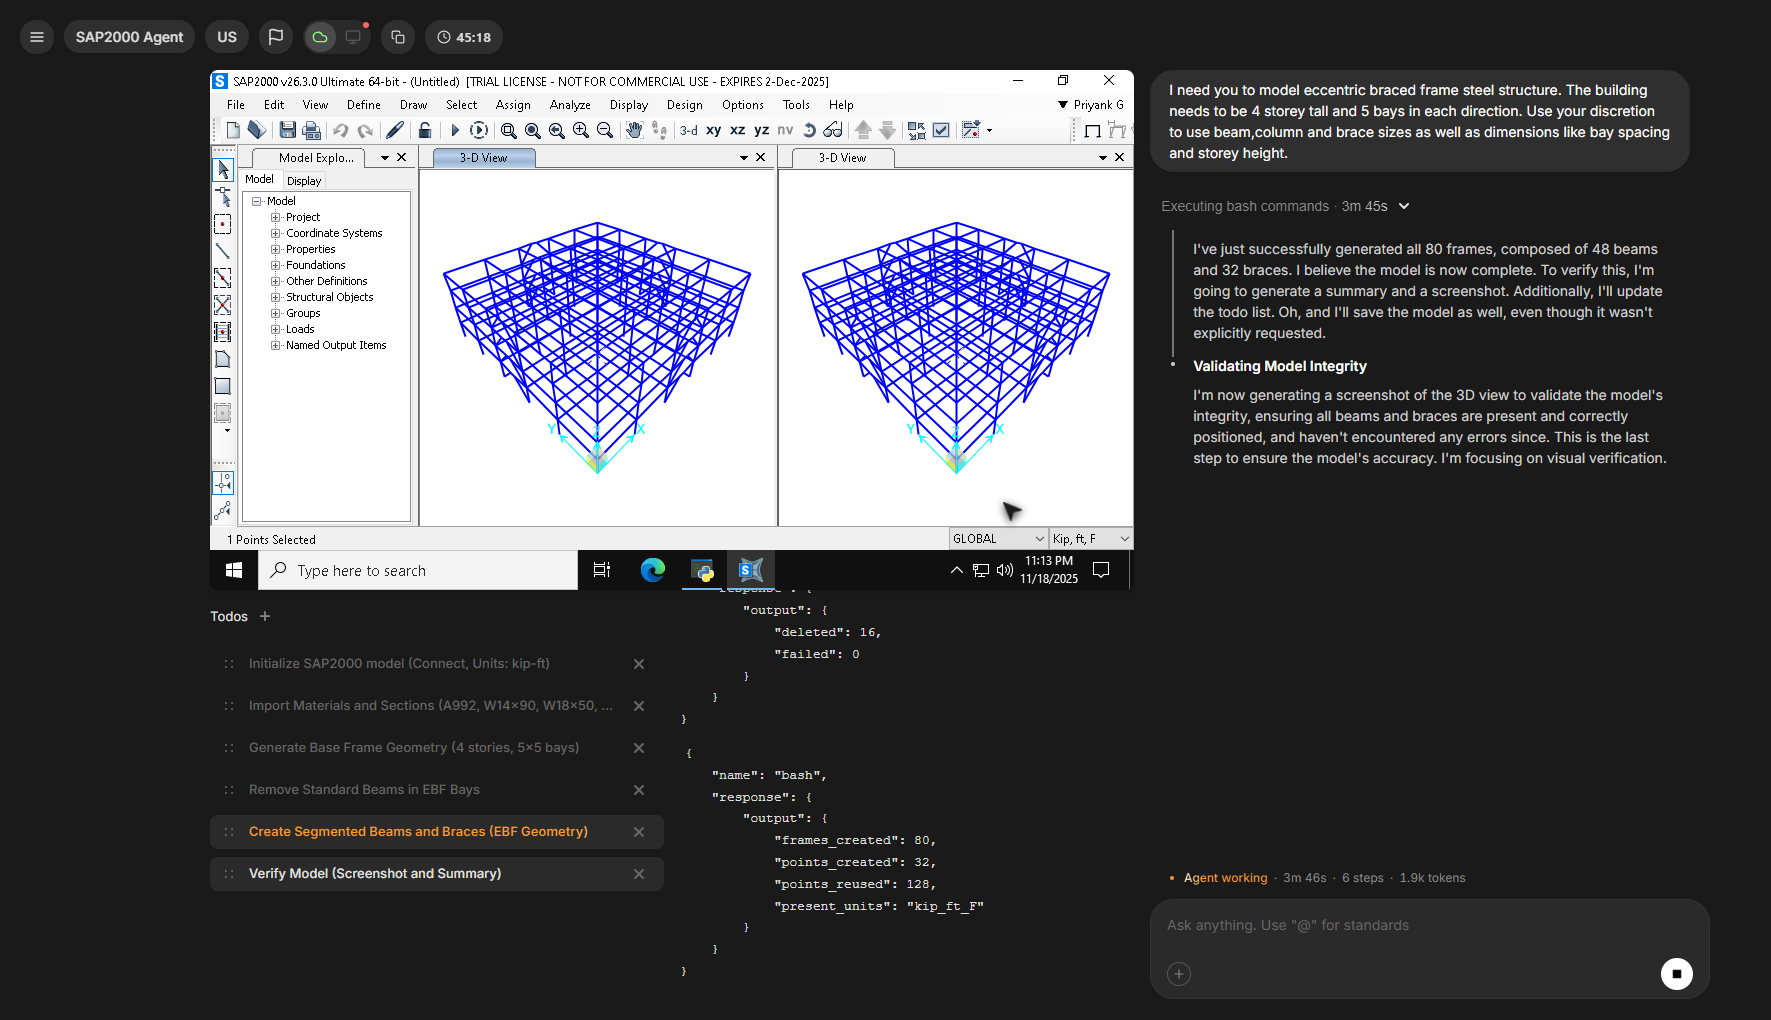 This page is the workflow. For prompting patterns, ETABS vs SAP2000 selection, and recovery when a session stalls, see the [ETABS & SAP2000 Agents guide](/platform-guides/etabs-sap2000-agents).
***
## Set Up Once
The agent drives the software on the machine where it is installed, so start with [Install & Sign In](/desktop-app/install-and-sign-in) on that machine.
The **Client** pill in the app header shows a green dot when the app is connected to your ETABS or SAP2000. Details in [Connecting ETABS & SAP2000](/desktop-app/connect-etabs-sap2000).
Choose **ETABS Agent** for buildings or **SAP2000 Agent** for bridges, trusses, and general structures, from the dropdown in the top-left corner.
This page is the workflow. For prompting patterns, ETABS vs SAP2000 selection, and recovery when a session stalls, see the [ETABS & SAP2000 Agents guide](/platform-guides/etabs-sap2000-agents).
***
## Set Up Once
The agent drives the software on the machine where it is installed, so start with [Install & Sign In](/desktop-app/install-and-sign-in) on that machine.
The **Client** pill in the app header shows a green dot when the app is connected to your ETABS or SAP2000. Details in [Connecting ETABS & SAP2000](/desktop-app/connect-etabs-sap2000).
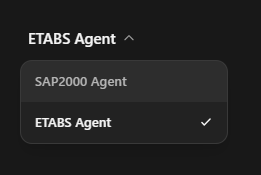
Choose **ETABS Agent** for buildings or **SAP2000 Agent** for bridges, trusses, and general structures, from the dropdown in the top-left corner.
 ***
## Stage the Build
A model built in stages is a model you can check at every step. Give the complete brief up front, then have the agent build one stage at a time: grids and stories, then framing, then loads, then the analysis run. Each stage gets verified before the next builds on it.
Geometry, sections, materials, code, and units, all in the first message. A complete brief gets a complete model; anything you leave out, the agent has to assume.
```text Example: model brief theme={null}
Build a 6-story office building in ETABS. Work in stages and
wait for my go-ahead between stages.
- Units: kip, ft
- Grids: 5 bays @ 30 ft in X, 3 bays @ 28 ft in Y
- Stories: 15 ft ground, 13 ft typical
- System: steel moment frames on the perimeter, W14 columns,
W24 girders, W16 infill beams
- Materials: A992 steel, 4000 psi concrete on metal deck
- Code: ASCE 7-22 load combinations
Start with grids and stories only.
```
Everything else hangs off the grid, so confirm it before any framing exists: *"Show me a plan view and an elevation before we continue."* Fixing a grid now takes one message; fixing it under a finished model takes a rebuild.
Columns, then beams, then walls and slabs, one system per message. After each: a screenshot, a quick scan, then the go-ahead. To change something, say exactly which members: *"Change the girders on levels 2 to 4 to W24x76, keep the roof as is."*
Apply gravity first, then lateral, and ask for a screenshot with load arrows visible to confirm the pattern and direction. If the wind and seismic demands still need deriving, [Wind & Seismic Load Calcs](/workflows/wind-seismic-loads) covers getting them from your site and code. Before moving on: *"List every load case and combination you have not applied yet."*
Run the analysis, then have the agent walk you through the results in the model: *"Walk me through the governing drift: story, combination, and value. Then give me the base reaction totals so I can compare them with my hand tally."* Save with a versioned name: *"Save as Office\_Building\_Demo\_v1.EDB."*
**One stage per request.** "Build the whole building" produces a model you have to reverse-engineer to trust. Staged builds produce a model you watched grow, with a checkpoint at every step.
***
## Build From Your Drawings
Attach the framing plan and reference it with **@** so the agent models from your sheet and your numbers. The [Mentions guide](/how-to/mentions) covers tagging files already in your project.
```text Example: model from a plan theme={null}
@S-201_Level2_Framing.pdf Build levels 1 to 3 in ETABS from this
plan. Use the grid dimensions and member sizes shown on the sheet.
Ask me before assuming anything the sheet does not show.
```
Work sheet by sheet, the way the set is organized: the framing plan for geometry, the column schedule for sections, the general notes for materials. Referencing the sheet in every request keeps the model traceable to the drawing it came from.
***
## Build From an IFC Model
When the geometry already exists as a BIM model, have the [BIM Agent](/platform-guides/bim-agent) read the IFC first and turn it into a modeling brief.
```text Example: IFC to modeling brief theme={null}
@Office_Building_Demo.ifc List the levels, grid lines, and every
column and beam with its section and material. Format the output
as a modeling brief I can hand to the ETABS Agent.
```
The BIM Agent opens the model in a viewer beside the chat while it reads the file:
***
## Stage the Build
A model built in stages is a model you can check at every step. Give the complete brief up front, then have the agent build one stage at a time: grids and stories, then framing, then loads, then the analysis run. Each stage gets verified before the next builds on it.
Geometry, sections, materials, code, and units, all in the first message. A complete brief gets a complete model; anything you leave out, the agent has to assume.
```text Example: model brief theme={null}
Build a 6-story office building in ETABS. Work in stages and
wait for my go-ahead between stages.
- Units: kip, ft
- Grids: 5 bays @ 30 ft in X, 3 bays @ 28 ft in Y
- Stories: 15 ft ground, 13 ft typical
- System: steel moment frames on the perimeter, W14 columns,
W24 girders, W16 infill beams
- Materials: A992 steel, 4000 psi concrete on metal deck
- Code: ASCE 7-22 load combinations
Start with grids and stories only.
```
Everything else hangs off the grid, so confirm it before any framing exists: *"Show me a plan view and an elevation before we continue."* Fixing a grid now takes one message; fixing it under a finished model takes a rebuild.
Columns, then beams, then walls and slabs, one system per message. After each: a screenshot, a quick scan, then the go-ahead. To change something, say exactly which members: *"Change the girders on levels 2 to 4 to W24x76, keep the roof as is."*
Apply gravity first, then lateral, and ask for a screenshot with load arrows visible to confirm the pattern and direction. If the wind and seismic demands still need deriving, [Wind & Seismic Load Calcs](/workflows/wind-seismic-loads) covers getting them from your site and code. Before moving on: *"List every load case and combination you have not applied yet."*
Run the analysis, then have the agent walk you through the results in the model: *"Walk me through the governing drift: story, combination, and value. Then give me the base reaction totals so I can compare them with my hand tally."* Save with a versioned name: *"Save as Office\_Building\_Demo\_v1.EDB."*
**One stage per request.** "Build the whole building" produces a model you have to reverse-engineer to trust. Staged builds produce a model you watched grow, with a checkpoint at every step.
***
## Build From Your Drawings
Attach the framing plan and reference it with **@** so the agent models from your sheet and your numbers. The [Mentions guide](/how-to/mentions) covers tagging files already in your project.
```text Example: model from a plan theme={null}
@S-201_Level2_Framing.pdf Build levels 1 to 3 in ETABS from this
plan. Use the grid dimensions and member sizes shown on the sheet.
Ask me before assuming anything the sheet does not show.
```
Work sheet by sheet, the way the set is organized: the framing plan for geometry, the column schedule for sections, the general notes for materials. Referencing the sheet in every request keeps the model traceable to the drawing it came from.
***
## Build From an IFC Model
When the geometry already exists as a BIM model, have the [BIM Agent](/platform-guides/bim-agent) read the IFC first and turn it into a modeling brief.
```text Example: IFC to modeling brief theme={null}
@Office_Building_Demo.ifc List the levels, grid lines, and every
column and beam with its section and material. Format the output
as a modeling brief I can hand to the ETABS Agent.
```
The BIM Agent opens the model in a viewer beside the chat while it reads the file:
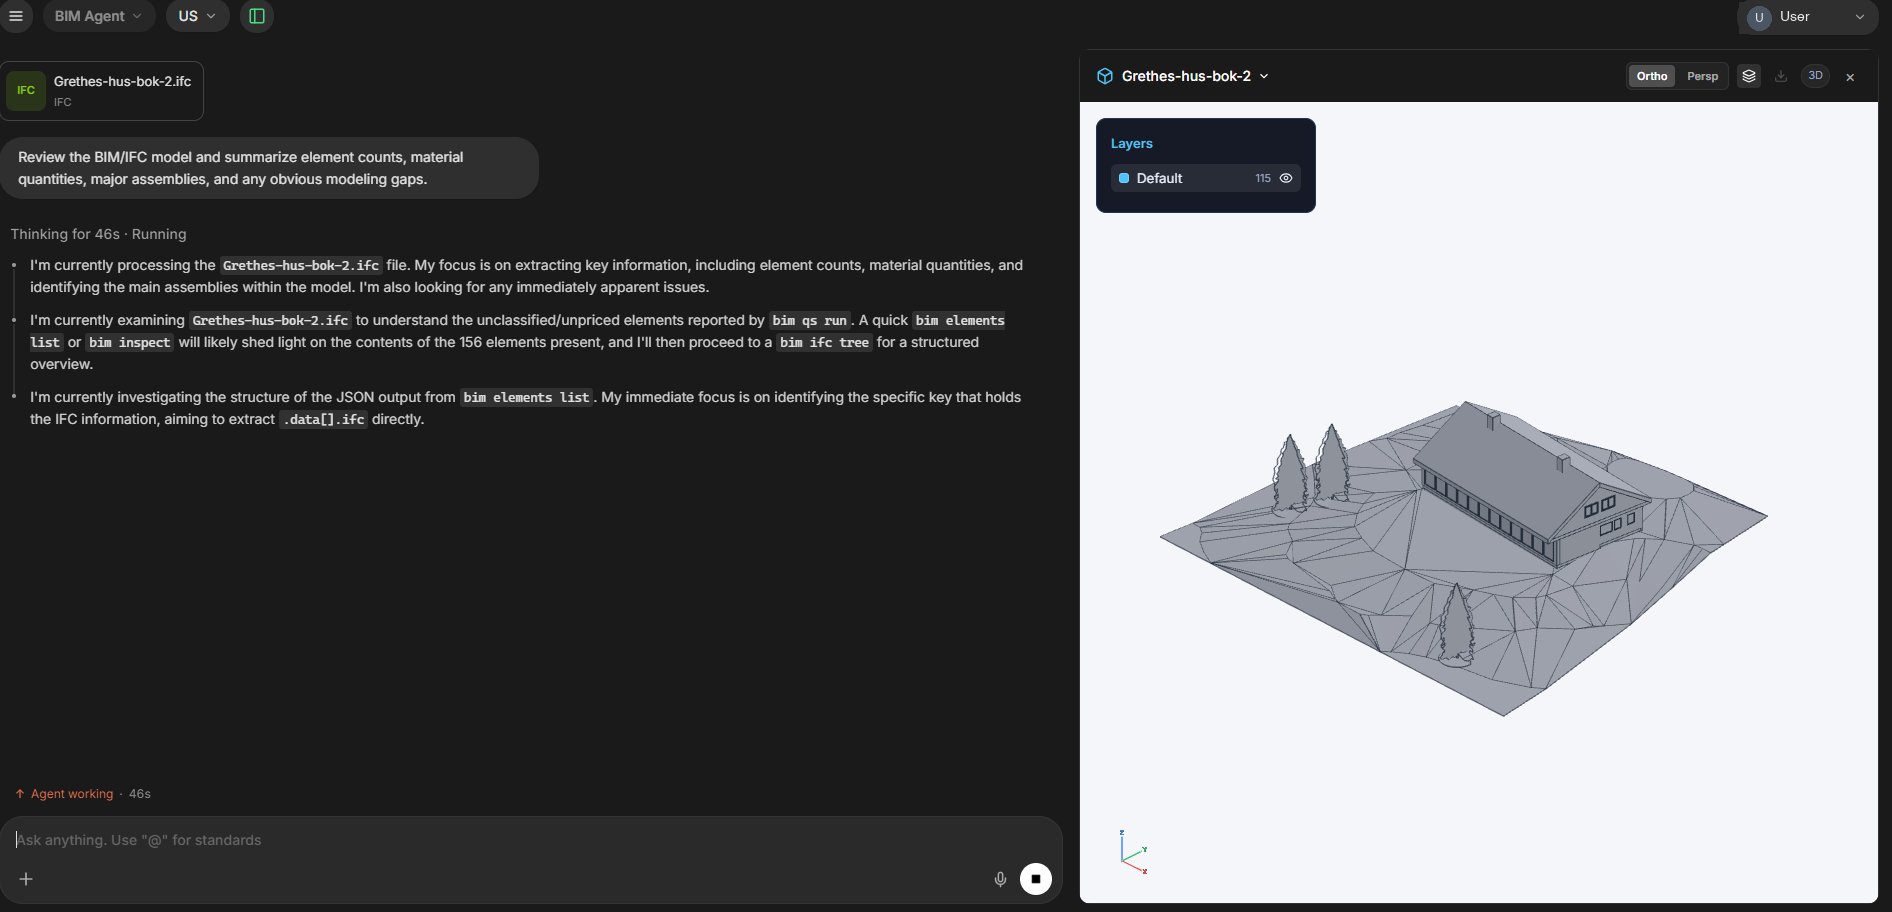 Take the brief it produces into an ETABS or SAP2000 Agent conversation and stage the build as above. You review the brief in between, which is exactly where a geometry error is cheapest to catch.
***
## A Bridge in SAP2000
The staged pattern carries over: alignment and supports first, then the superstructure, then loads.
```text Example: bridge brief theme={null}
Build a 3-span continuous steel plate girder bridge in SAP2000.
Work in stages and confirm each stage with a screenshot.
- Units: kN, m
- Spans: 35 m + 45 m + 35 m
- Cross-section: 4 girders at 3.0 m spacing, 250 mm composite deck
- Supports: bearings at abutments and piers, continuous girders
over the piers
- Loads come after geometry is confirmed: self-weight,
superimposed dead 2.5 kPa, then AASHTO HL-93
Start with the girder layout and supports.
```
Trusses, space frames, and cable systems follow the same rhythm; the [SAP2000 examples](/platform-guides/etabs-sap2000-agents) show briefs for each.
***
## Verify As You Go
Three habits keep a staged build honest:
* **Screenshot every stage.** A plan and an elevation after each stage catches misplaced grids and missing members while they are one message deep.
* **Ask what is missing before the run.** *"List every load case and combination you have not applied yet"* turns the gap between intent and model into a to-do list.
* **Read the numbers back after the run.** Have the agent open the saved file and report the governing drift and reaction totals, then compare them against your expectations.
You are the engineer of record: the model that goes forward is the one you have checked, and a staged build gives you a checkpoint trail to check it against. For a deeper verification pass on the finished model, export the results and run [Check an Existing Model](/workflows/check-existing-model).
***
## Next Steps
The Client pill, working folders, and detected versions.
Prompting patterns, examples, and stall recovery.
Export the results and verify them against code limits.
Derive the lateral loads before you apply them.
[Wind & Seismic Load Calcs](/workflows/wind-seismic-loads)
**Questions?** Email **[support@stru.ai](mailto:support@stru.ai)** or [book a call](https://cal.com/bhosh).
Take the brief it produces into an ETABS or SAP2000 Agent conversation and stage the build as above. You review the brief in between, which is exactly where a geometry error is cheapest to catch.
***
## A Bridge in SAP2000
The staged pattern carries over: alignment and supports first, then the superstructure, then loads.
```text Example: bridge brief theme={null}
Build a 3-span continuous steel plate girder bridge in SAP2000.
Work in stages and confirm each stage with a screenshot.
- Units: kN, m
- Spans: 35 m + 45 m + 35 m
- Cross-section: 4 girders at 3.0 m spacing, 250 mm composite deck
- Supports: bearings at abutments and piers, continuous girders
over the piers
- Loads come after geometry is confirmed: self-weight,
superimposed dead 2.5 kPa, then AASHTO HL-93
Start with the girder layout and supports.
```
Trusses, space frames, and cable systems follow the same rhythm; the [SAP2000 examples](/platform-guides/etabs-sap2000-agents) show briefs for each.
***
## Verify As You Go
Three habits keep a staged build honest:
* **Screenshot every stage.** A plan and an elevation after each stage catches misplaced grids and missing members while they are one message deep.
* **Ask what is missing before the run.** *"List every load case and combination you have not applied yet"* turns the gap between intent and model into a to-do list.
* **Read the numbers back after the run.** Have the agent open the saved file and report the governing drift and reaction totals, then compare them against your expectations.
You are the engineer of record: the model that goes forward is the one you have checked, and a staged build gives you a checkpoint trail to check it against. For a deeper verification pass on the finished model, export the results and run [Check an Existing Model](/workflows/check-existing-model).
***
## Next Steps
The Client pill, working folders, and detected versions.
Prompting patterns, examples, and stall recovery.
Export the results and verify them against code limits.
Derive the lateral loads before you apply them.
[Wind & Seismic Load Calcs](/workflows/wind-seismic-loads)
**Questions?** Email **[support@stru.ai](mailto:support@stru.ai)** or [book a call](https://cal.com/bhosh).