> ## Documentation Index
> Fetch the complete documentation index at: https://docs.stru.ai/llms.txt
> Use this file to discover all available pages before exploring further.
# ETABS & SAP2000 Agents
> Build and analyze 3D structural models using natural language prompts
## Getting Started
The ETABS and SAP2000 agents let you build structural models through conversation. Describe what you want, and the agent creates the model automatically.
The agents work through the **Stru AI desktop app** running on the same computer where ETABS or SAP2000 is installed. The agent controls your local software directly, with your licenses, templates, and files. New to the desktop app? Start with [Install & Sign In](/desktop-app/install-and-sign-in), then come back here.
[Download the Stru AI desktop app](https://stru.ai/download) and install it on your machine with ETABS or SAP2000 ([step-by-step install guide](/desktop-app/install-and-sign-in)).
Run the Stru AI app on your computer. It connects your local ETABS/SAP2000 installation to the agent.
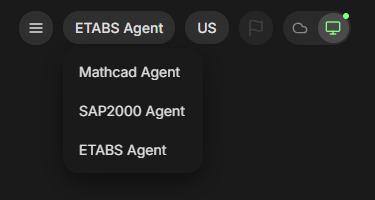
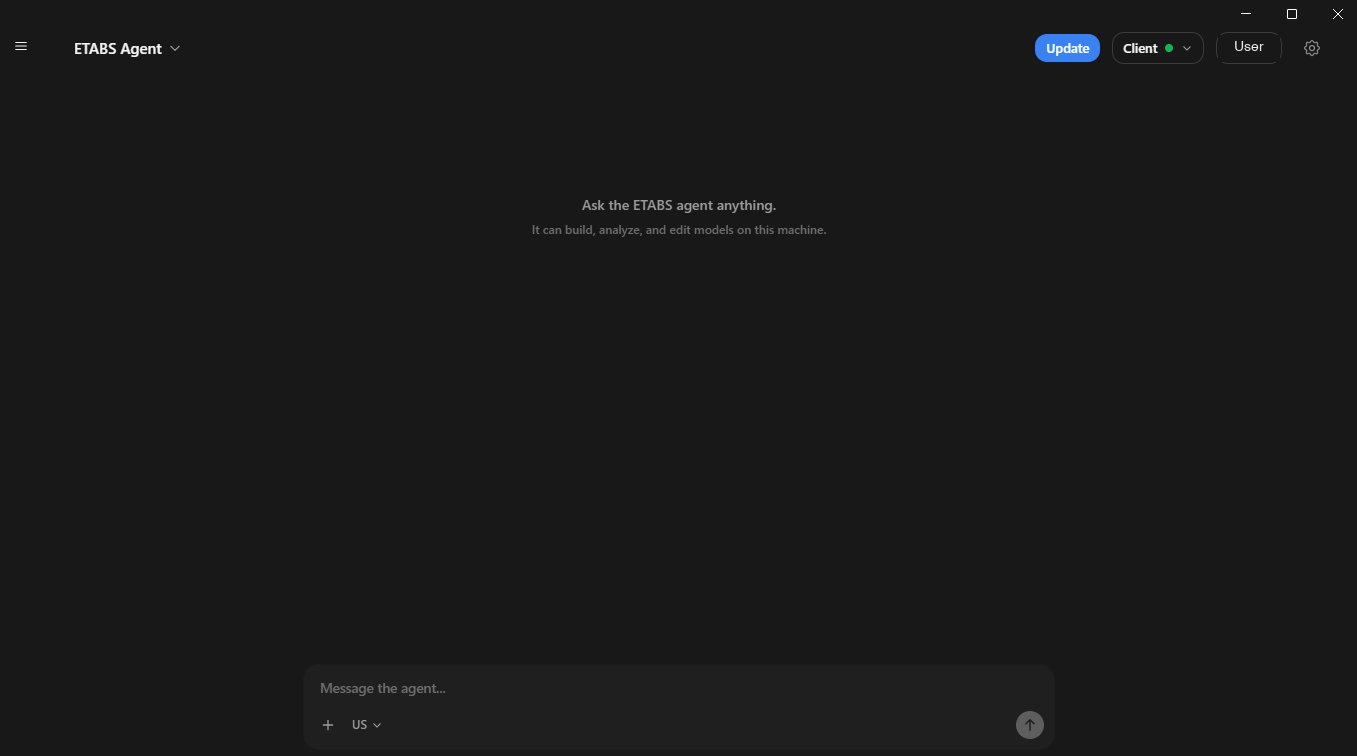
Sign in with your email. Then use the dropdown in the **top-left** corner to choose **ETABS Agent** or **SAP2000 Agent** for the software you want to drive.
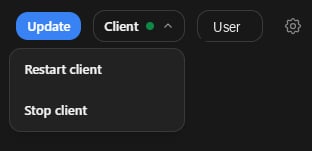
Use the **Client** control in the **top-right** corner to connect the app to your local ETABS/SAP2000. A **green dot** means the client is connected and ready. From the same dropdown you can **Restart client** (reconnect) or **Stop client** (disconnect). The **Update** button keeps the app on the latest version. More detail: [Connecting ETABS & SAP2000](/desktop-app/connect-etabs-sap2000).
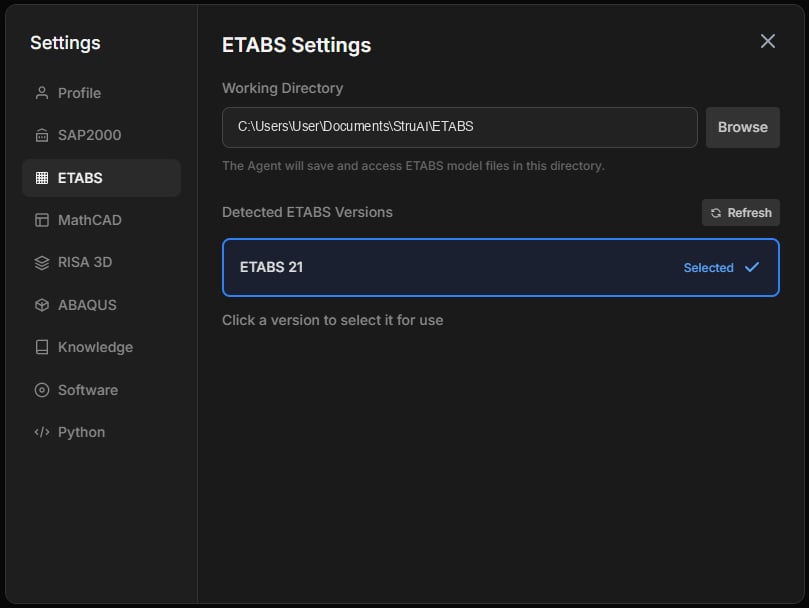
Open **Settings** (gear icon, top-right) to verify the app is connected with SAP2000/ETABS and to check/update the working directory. The agent will use this directory to save new models and access existing models.
You can chat with the agent in two ways:
**Option 1, in the app:** Once the client shows a green dot, type your request in the **Message the agent...** box at the bottom of the app window and start building. Everything runs against your local ETABS/SAP2000.
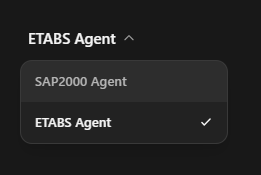
**Option 2, via browser:** Go to [app.stru.ai](https://app.stru.ai), select **ETABS Agent** or **SAP2000 Agent** from the top-left dropdown, then click the monitor icon with the green dot to connect to your computer app. Chat from the website while the agent drives your local software.
Models are created in your local ETABS/SAP2000. Save files directly to your machine using the working directory configured in the app settings, use your own templates, and leverage your local computing resources.
**Why local?** Full control over your files, access to your templates and section databases, fast performance, and everything stays on your machine.
**Pro Tip:** Use **@** to search building codes while writing prompts. Try `@ASCE 7` for wind loads or `@ACI 318` for concrete design.
### Agent in Action
Watch the SAP2000 Agent build a steel structure through the Stru AI desktop app:
The Stru AI app runs on your machine and connects to your local ETABS/SAP2000 installation. You chat through the app or your browser while the agent controls the software directly on your computer.
The interface shows:
* **Center:** Interactive 3D model views from SAP2000/ETABS - click to select elements for modification
* **Right panel:** Agent's explanation of what was built and validation summary
* **Bottom:** Task breakdown with completed (✓) and in-progress (⚡) steps
***
## ETABS vs SAP2000: Which Agent?
**Choose for:**
* Buildings (high-rise, concrete frames, shear walls)
* Floor diaphragms and vertical load distribution
* Building-specific seismic and wind design
* Story-based modeling workflows
**Choose for:**
* Bridges, trusses, space frames
* Industrial structures and towers
* Long-span systems and stadiums
* General-purpose structural analysis
***
## Writing Effective Prompts
### The Golden Rule
**Either be specific OR explicitly give the agent discretion.** Avoid vague prompts.
```text ✅ Good: Be Specific theme={null}
Create a 4-story building:
- Plan: 120ft x 80ft
- Bays: 4 @ 30ft in X, 4 @ 20ft in Y
- Story heights: 15ft ground, 12ft typical
- Columns: W14x120
- Beams: W21x50
- Units: kip-ft
```
```text ✅ Good: Give Discretion theme={null}
Create a 4-story office building, roughly 120ft x 80ft.
Use your engineering judgment for bay spacing, member
sizes, and story heights appropriate for office loads.
```
```text ❌ Bad: Vague theme={null}
Create a building with some beams and columns.
```
### Key Prompt Elements
Always include units in your first prompt:
✅ "Use kip-ft units for this model..."
Prevents unit confusion later.
For complex structures, work incrementally:
```text theme={null}
First, create the basic frame geometry.
[Review screenshot]
Now add X-bracing to perimeter frames.
[Review again]
Finally, apply gravity loads.
```
Specify load directions clearly:
✅ "Apply loads in gravity direction (downward)"
✅ "Wind loads in Global Y direction"
✅ "Distributed along member length"
***
## Common Use Cases
### Concrete Building Frame
```text theme={null}
Create a 5-story reinforced concrete frame:
- Plan: 100ft x 75ft
- 5 bays @ 20ft in X, 5 bays @ 15ft in Y
- Story height: 12ft typical
- Columns: 24"x24", Beams: 18"x24"
- Concrete: f'c = 4000 psi
- Apply loads: DL=120psf, LL=60psf
```
### Adding Shear Walls
```text theme={null}
Add concrete shear walls to the existing frame:
- Walls on gridlines A and D (perimeter)
- Wall thickness: 12"
- Height: Full building height
- Connect to existing frame with rigid connections
```
### Modifying Existing Model
**Option 1: Describe the changes**
```text theme={null}
Change all columns on levels 3-5 to 24"x30".
Keep levels 1-2 as 24"x24". Show before/after comparison.
```
**Option 2: Select and modify**
Click to select specific columns in the 3D viewer, then: *"Change these selected columns to 24"x30""*
### Floor Diaphragm Modeling
```text theme={null}
Add floor diaphragms at all levels:
- Slab thickness: 8"
- Diaphragm type: Rigid
- Include openings for stairs and elevator shafts
- Apply floor loads: DL=120psf, LL=60psf
```
### Steel Truss Bridge
```text theme={null}
Create a 100ft Warren truss:
- Span: 100ft, Depth: 12ft, Panel spacing: 10ft
- Top chord: HSS10x10x5/8
- Bottom chord: HSS8x8x1/2
- Web members: HSS6x6x3/8
- Supports: Pin at left, roller at right
```
### Space Frame Structure
```text theme={null}
Create a 60ft x 60ft space frame roof:
- Grid: 10ft x 10ft spacing
- Height: 15ft at center, 10ft at edges (sloped)
- Members: HSS4x4x1/4 for all elements
- Support: Columns at perimeter grid points
```
### Steel Frame with Bracing
```text theme={null}
Create a 3-story industrial steel frame:
- Plan: 80ft x 60ft, 4 bays @ 20ft, 3 bays @ 20ft
- Story heights: 20ft ground, 15ft typical
- Columns: W14x90, Beams: W18x35
- Add X-bracing on gridlines A and D, all stories
- Use HSS8x8x1/2 for braces
```
### Load Combinations
```text theme={null}
Apply gravity loads to all beams:
- Dead: 1.2 kip/ft (includes self-weight)
- Live: 0.8 kip/ft
- Wind: 40 psf lateral pressure
Create ASCE 7-22 load combinations for gravity and wind design.
```
***
## Advanced Usage
### Study and Recreate Existing Models
The agent can analyze existing models and recreate them with modifications:
```text theme={null}
Open 'Existing_Building.sdb' and study its geometry, sections,
and loads. Then create a similar model but with:
- 20% taller story heights
- Updated to ASCE 7-22 wind loads
- Member sizes optimized for new loads
```
**Use cases:** Modernize old models to new code provisions, create design variations, or standardize legacy projects.
### Compare Two Models
Compare different design options:
```text theme={null}
Compare 'Option_A.sdb' and 'Option_B.sdb':
1. Total steel weight difference
2. Drift ratios under lateral loads
3. Foundation reactions comparison
4. Cost implications of member size differences
```
**Use cases:** Design optimization, value engineering studies, structural system selection, and code compliance verification.
### Use Sketches and Floor Plans
Upload drawings to convey information:
```text theme={null}
I'm attaching a floor plan sketch. Create a 3-story model
based on this layout. Use W14 columns and W18 beams.
Story height: 12ft.
```
**What you can upload:** Hand-drawn sketches, PDF floor plans, marked-up elevations, or structural diagrams. The agent interprets dimensions, grid layouts, and structural intent from images.
### Parametric Design and Iterations
Rapidly generate design variations for optimization studies, value engineering, and sensitivity analysis.
**Lateral system comparison**
```text theme={null}
Model the same building with three lateral systems:
1. Perimeter moment frames
2. Interior braced frames
3. Concrete shear walls at core
Compare drift, period, material quantities, and foundation demands.
```
**Floor system optimization**
```text theme={null}
Create 4 variations of floor framing:
1. Post-tensioned slab (8" thick)
2. Two-way concrete slab (10" thick)
3. One-way joist system (24" depth)
4. Composite steel deck (3" deck + 12" beams)
Compare cost, weight, and floor-to-floor height.
```
**Building height study**
```text theme={null}
Create iterations for 4, 6, 8, and 10 story variations:
- Keep same footprint (120ft x 80ft)
- Adjust column sizes for increased height
- Compare seismic base shear and drift
- Report steel/concrete quantities per floor
```
**Truss depth optimization**
```text theme={null}
Create 3 models with truss depths of 10ft, 12ft, and 15ft:
- Same 120ft span
- Keep all other parameters constant
- Report: Deflections, steel weight, connection complexity
```
**Bridge cable configuration**
```text theme={null}
Model cable-stayed bridge with different cable patterns:
1. Fan arrangement (all cables from tower top)
2. Harp arrangement (parallel cables)
3. Semi-fan hybrid
Compare deck moments, tower forces, and cable quantities.
```
**Member size optimization**
```text theme={null}
Create 5 design iterations:
Base case: Space frame with HSS4x4x1/4
Iterations:
1. HSS5x5x5/16 (heavier)
2. HSS3x3x3/16 (lighter)
3. Mixed sizing (perimeter vs interior)
4. Optimize for minimum weight under deflection limit
Save each and compare weight/deflection tradeoffs.
```
The agent handles the repetitive modeling work, letting you focus on engineering decisions.
***
## Best Practices
**Always specify units first**
Include units in your opening prompt: *"Create a model using kip-ft units..."*
**Build geometry before loads**
Create structure first → Review screenshot → Apply loads → Verify patterns → Run analysis
**Save incrementally**
Save at major milestones: *"Save as 'Building\_BaseFrame\_v1.sdb' before we modify the lateral system"*
**Be explicit about changes**
✅ *"Change columns on levels 3-5 only, keep 1-2 as-is"*
❌ *"Update some columns"*
**Use filters for bulk edits**
Target specific elements: *"Change all beams longer than 30ft to W21x62. Keep beams under 30ft as W18x35."*
**Select elements directly in the model**
Click to select frames, joints, or areas in the ETABS/SAP2000 viewer, then ask the agent to modify your selection: *"Change these selected beams to W21x50"*
**Group similar loads together**
Apply multiple load cases in one prompt: *"Apply to all floor beams: Dead 1.0 kip/ft, Live 0.6 kip/ft, Snow 0.8 kip/ft (roof only)"*
**Use standard combinations**
The agent knows code requirements: *"Create ASCE 7-22 load combinations for gravity and wind design"*
**Verify with visuals**
Request screenshots with load arrows to confirm the pattern is correct.
***
## Troubleshooting
### Model Doesn't Look Right
```text theme={null}
Show me:
- Isometric view
- Plan view at level 2
- Elevation along gridline A
```
```text theme={null}
List all frame members with their coordinates and sections.
```
```text theme={null}
This isn't quite right. Let's create a new model.
This time, use 4 bays @ 25ft instead of 5 bays @ 20ft.
```
### Agent Seems Stuck
If the agent stops responding, keeps repeating the same step, or gets caught in a loop, work through the fixes below **from top to bottom**: start with a prompt nudge, and only restart the client or model if prompts don't help.
**Recovery ladder:** (1) Ask for status → (2) Redirect with a prompt → (3) Simplify or break it down → (4) Start the task from scratch → (5) Restart the client → (6) Close the model and start a fresh session. Each step is a bigger reset than the last.
**Try a Prompt First**
See where the agent is before changing anything:
```text theme={null}
What's the current status? Which step are you on, and
are you stuck or waiting on something?
```
Nudge the agent to step back instead of pushing the same path:
```text theme={null}
This approach doesn't seem to be working. Stop and
rethink it. Explain a simpler plan before you make any
more changes, then proceed once the plan looks right.
```
Strip the task down to the essentials and add detail later:
```text theme={null}
Let's pause. Just create the basic frame geometry
without loads for now.
```
Instead of one complex prompt, use a sequence and review between steps:
1. Create geometry
2. Add lateral system
3. Apply loads
4. Run analysis
If the model is in a bad state, have the agent abandon it and rebuild cleanly:
```text theme={null}
Let's start over from scratch. Discard the current
progress, create a new model, and rebuild it step by
step. Confirm each step with a screenshot before moving on.
```
**Reset the Session**
If prompts aren't getting through, the connection between the app and ETABS/SAP2000 may have hung. Reset it.
Open the **Client** dropdown in the top-right of the app and choose **Restart client**. This reconnects the app to ETABS/SAP2000 without closing your model. Wait for the **green dot**, then send your prompt again.
If a restart doesn't help, the ETABS/SAP2000 model itself may be in a stuck state:
1. **Stop client** from the Client dropdown.
2. Close the model in ETABS/SAP2000 (save first if you want to keep it).
3. Reopen ETABS/SAP2000, then **Restart client** and wait for the green dot.
4. Ask the agent to reopen your saved model, or start a fresh build.
A clean model and a fresh client connection clears the large majority of stuck states.
If the agent is still stuck after a full restart, click **Update** (top-right) to make sure you're on the latest app version, then try again. If the problem persists, email **[support@stru.ai](mailto:support@stru.ai)** with a short description and a screenshot.
### Loads Not Applied Correctly
```text theme={null}
List all load patterns and show which members have
loads in the DEAD case.
```
```text theme={null}
Verify the loads are applied downward (gravity).
Reapply if the direction is wrong.
```
```text theme={null}
Screenshot with load arrows visible.
```
***
## Real-World Workflow
Complete design sessions showing iteration and refinement:
```text theme={null}
Create a 4-story office building:
- 150ft x 100ft plan
- 5 bays @ 30ft in long direction
- 4 bays @ 25ft in short direction
- Story heights: 15ft ground, 13ft typical
- Use engineering judgment for member sizes
- Units: kip-ft
```
*Agent creates model with W14x176 columns, W24x62 beams*
```text theme={null}
Beams seem heavy. Try W21x50 for levels 2-4,
keep W24x62 at ground only.
```
*Agent updates sections*
```text theme={null}
Make perimeter frames on gridlines A and E moment-connected
for lateral resistance.
```
*Agent modifies connections*
```text theme={null}
Floor loads:
- Dead: 100psf (slab + MEP + ceiling)
- Live: 50psf (office)
- Roof: Dead 80psf, Live 20psf
Create ASCE 7 gravity combinations.
```
*Agent applies loads and combinations*
```text theme={null}
Before analysis, show:
1. Isometric with loads visible
2. Total applied loads by level
3. List of load combinations
```
*Agent provides verification package*
```text theme={null}
Save as 'Office_Gravity_Rev1.edb'
```
*Agent saves and provides download link*
```text theme={null}
Create a 150ft Pratt truss bridge:
- Span: 150ft, Depth: 20ft
- Panel spacing: 15ft (10 panels)
- Top chord: HSS12x12x5/8
- Bottom chord: HSS10x10x1/2
- Verticals/diagonals: HSS8x8x3/8
- Units: kip-ft
```
*Agent creates truss geometry with member assignments*
```text theme={null}
Add bridge deck:
- Width: 30ft
- Composite steel girders @ 10ft spacing
- Connect deck to top chord at panel points
```
*Agent adds deck framing*
```text theme={null}
The bearing at the right end needs to allow thermal
expansion. Change it to a guided roller support allowing
movement in the longitudinal direction only.
```
*Agent modifies boundary conditions*
```text theme={null}
Apply loads:
- Dead: Deck self-weight + 25 psf utilities
- HL-93 live load pattern on deck
- Wind: 30 psf lateral on exposed area
Create AASHTO load combinations.
```
*Agent applies bridge loading*
```text theme={null}
Show me a summary of member forces and highlight any
members with high stress ratios. Focus on diagonals and
chord members.
```
*Agent provides force summary with critical members flagged*
```text theme={null}
Save as 'Truss_Bridge_Rev1.sdb'
```
*Agent saves and provides download link*
***
## Tips for Success
* **Iterate freely** - Don't expect perfection first try. Refine with follow-ups: *"Can you adjust the bay spacing to be more uniform?"*
* **Interactive selection** - Click elements in the 3D viewer to select them, then ask the agent to modify your selection
* **Request screenshots** - Ask for visual verification at key stages: *"Show isometric view to confirm bracing layout"*
* **Upload references** - Attach floor plans, sketches, or existing models to guide the agent and convey complex information visually
* **Compare options** - Generate multiple design variations quickly for value engineering and optimization studies
***
## Next Steps
Install the Stru AI app and pair it with your account.
The Client pill, working folders, and detected versions.
Create a model from a floor plan or structural drawing.
Tag ASCE 7, ACI 318, AISC 360, and IBC in your prompts.
**Questions?** Email **[support@stru.ai](mailto:support@stru.ai)** or [book a call](https://cal.com/bhosh) to discuss your use case.
 **Option 2, via browser:** Go to [app.stru.ai](https://app.stru.ai), select **ETABS Agent** or **SAP2000 Agent** from the top-left dropdown, then click the monitor icon with the green dot to connect to your computer app. Chat from the website while the agent drives your local software.